Docusaurus(文档站框架)
Docusaurus 是一个开源的静态网站生成器,专注于帮助开发者快速构建、部署和维护文档类网站。
下载运行
npx create-docusaurus@latest my-website classic
如果需要支持 typescript,则使用
npx create-docusaurus@latest my-website classic --typescript
下载依赖
pnpm i
运行项目
pnpm run start
项目结构
默认的项目结构如下
my-website
├── blog
│   ├── 2019-05-28-hola.md
│   ├── 2019-05-29-hello-world.md
│   └── 2020-05-30-welcome.md
├── docs
│   ├── doc1.md
│   ├── doc2.md
│   ├── doc3.md
│   └── mdx.md
├── src
│   ├── css
│   │   └── custom.css
│   └── pages
│       ├── styles.module.css
│       └── index.ts
├── static
│   └── img
├── docusaurus.config.ts
├── package.json
├── README.md
├── sidebars.ts
└── yarn.lock
目录介绍:
blog- 存放博客文章,格式是 Markdowndocs- 存放文档内容,也用 Markdown 格式src- 存放自定义的页面和样式。static- 存放自定义的页面和样式docusaurus.config.ts- 配置网站的各种信息sidebars.ts- 配置 docs 侧边栏的内容和结构
关于文档的创建和配置
Navbar 配置
在 docusaurus.config.ts 文件中进行配置, config - themeConfig - navbar - items
单级导航
在 docs 文件夹下创建 test.md 文件,并在 items 配置项中添加:
{
  // ...
  "items": [
    {
      "to": "/docs/test",
      "label": "test"
    }
  ]
}
刷新页面,即可进行预览
多级导航
docusaurus 的 navbar 最多支持两级导航,比如:
{
  // ...
  "items": [
    {
      "type": "dropdown",
      "label": "编程语言",
      "position": "left",
      "items": [
        {
          "label": "Stack Overflow",
          "href": "https://stackoverflow.com/questions/tagged/docusaurus"
        },
        {
          "label": "Discord",
          "href": "https://discordapp.com/invite/docusaurus"
        }
      ]
    }
  ]
}
图标配置
以 Github 图标为例
修改 docusaurus.config.ts 文件:
{
  // ...
  "items": [
    {
      "aria-label": "GitHub Repository",
      "className": "navbar--github-link",
      "href": "https://github.com/oneao",
      "position": "right",
      "title": "Github"
    }
  ]
}
在 src/css/custom.css 中添加以下内容:
.navbar--github-link {
  width: 2rem;
  height: 2rem;
  padding: 0.25rem;
  margin: 0rem 0.2rem;
  border-radius: 50%;
  transition: background var(--ifm-transition-fast);
}

.navbar--github-link:hover {
  background: var(--ifm-color-emphasis-200);
}

.navbar--github-link:before {
  content: '';
  height: 100%;
  display: block;
  background: url("data:image/svg+xml,%3Csvg viewBox='0 0 24 24' xmlns='http://www.w3.org/2000/svg'%3E%3Cpath d='M12 .297c-6.63 0-12 5.373-12 12 0 5.303 3.438 9.8 8.205 11.385.6.113.82-.258.82-.577 0-.285-.01-1.04-.015-2.04-3.338.724-4.042-1.61-4.042-1.61C4.422 18.07 3.633 17.7 3.633 17.7c-1.087-.744.084-.729.084-.729 1.205.084 1.838 1.236 1.838 1.236 1.07 1.835 2.809 1.305 3.495.998.108-.776.417-1.305.76-1.605-2.665-.3-5.466-1.332-5.466-5.93 0-1.31.465-2.38 1.235-3.22-.135-.303-.54-1.523.105-3.176 0 0 1.005-.322 3.3 1.23.96-.267 1.98-.399 3-.405 1.02.006 2.04.138 3 .405 2.28-1.552 3.285-1.23 3.285-1.23.645 1.653.24 2.873.12 3.176.765.84 1.23 1.91 1.23 3.22 0 4.61-2.805 5.625-5.475 5.92.42.36.81 1.096.81 2.22 0 1.606-.015 2.896-.015 3.286 0 .315.21.69.825.57C20.565 22.092 24 17.592 24 12.297c0-6.627-5.373-12-12-12'/%3E%3C/svg%3E")
    no-repeat;
}

html[data-theme='dark'] .navbar--github-link:before {
  background: url("data:image/svg+xml,%3Csvg viewBox='0 0 24 24' xmlns='http://www.w3.org/2000/svg'%3E%3Cpath fill='white' d='M12 .297c-6.63 0-12 5.373-12 12 0 5.303 3.438 9.8 8.205 11.385.6.113.82-.258.82-.577 0-.285-.01-1.04-.015-2.04-3.338.724-4.042-1.61-4.042-1.61C4.422 18.07 3.633 17.7 3.633 17.7c-1.087-.744.084-.729.084-.729 1.205.084 1.838 1.236 1.838 1.236 1.07 1.835 2.809 1.305 3.495.998.108-.776.417-1.305.76-1.605-2.665-.3-5.466-1.332-5.466-5.93 0-1.31.465-2.38 1.235-3.22-.135-.303-.54-1.523.105-3.176 0 0 1.005-.322 3.3 1.23.96-.267 1.98-.399 3-.405 1.02.006 2.04.138 3 .405 2.28-1.552 3.285-1.23 3.285-1.23.645 1.653.24 2.873.12 3.176.765.84 1.23 1.91 1.23 3.22 0 4.61-2.805 5.625-5.475 5.92.42.36.81 1.096.81 2.22 0 1.606-.015 2.896-.015 3.286 0 .315.21.69.825.57C20.565 22.092 24 17.592 24 12.297c0-6.627-5.373-12-12-12'/%3E%3C/svg%3E")
    no-repeat;
}

/* 兼容屏幕过小情况,转为文字 */
@media screen and (max-width: 996px) {
  .navbar--github-link {
    margin: 0rem;
    padding: var(--ifm-menu-link-padding-vertical) var(--ifm-menu-link-padding-horizontal);
    line-height: 1.25;
    width: 100%;
    color: var(--ifm-menu-color);
    font-size: 1rem;
  }

  .navbar--github-link::before {
    content: 'GitHub';
    background-image: none;
  }

  [data-theme='dark'] .navbar--github-link::before {
    content: 'GitHub';
    background-image: none;
  }
}
提供两个工具网站仅供参考:
- svg 图标库:https://www.svgrepo.com/
- svg 转 url 编码:https://yoksel.github.io/url-encoder/zh-cn/
侧边栏 配置
docs 的侧边栏配置主要在 sidebars.ts 文件中
自动生成
在 docs 目录中创建 coding/java 目录,在 sidebar.ts 文件中添加配置:
import type { SidebarsConfig } from '@docusaurus/plugin-content-docs'

const sidebars: SidebarsConfig = {
  // coding 目录下的自动生成的 Java 相关文档
  javaSidebar: [{ type: 'autogenerated', dirName: 'coding/java' }]
}

export default sidebars
修改 docusaurus.config.ts 文件:
{
  // ...
  "items": [
    {
      "type": "dropdown",
      "label": "编程语言",
      "position": "left",
      "items": [
        {
          "type": "docSidebar",
          "label": "Java",
          "sidebarId": "javaSidebar"
        }
      ]
    }
  ]
}
提示:
sidebarId需要和SidebarsConfig中的 key 保持一致type: 'autogenerated'表示自动生成- 自动生成模式下 将自动根据目录和目录下的文件自动构建侧边栏
手动配置
import type { SidebarsConfig } from '@docusaurus/plugin-content-docs'

const sidebars: SidebarsConfig = {
  // 手动配置的侧边栏
  javaSidebar: [
    {
      type: 'category',
      label: 'Java 基础',
      items: ['coding/java/intro', 'coding/java/advanced'],
    },
    {
      type: 'category',
      label: 'Java 框架',
      items: ['coding/java/spring-boot', 'coding/java/hibernate'],
    },
  ]
}

export default sidebars
插件
Algolia(全局搜索)
Algolia 是一个强大的搜索引擎平台,专注于提供快速、可定制的搜索功能。它通常用于为网站、应用或文档提供实时搜索和自动完成功能。
1. 配置 algolia
先到 官网 注册申请,大概两天后会收到邮件通知注册成功,再接着往下操作(不确定是否需要这步)
申请 Application
点击 + Create Application 申请新的应用
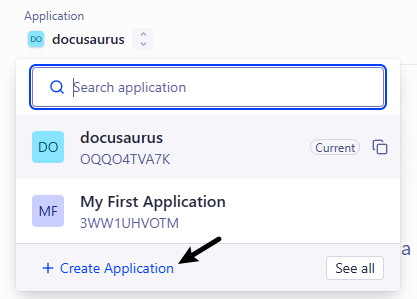
申请表单填写步骤:
- 输入名称
Select your Search plan选择Algolia即可,DocSearch需要申请,但是允许查询次数比较多- 地区随便选择一个即可
申请 Index
点击菜单栏的 Search 或直接搜索栏搜索 Index 进入 Index 相关页面

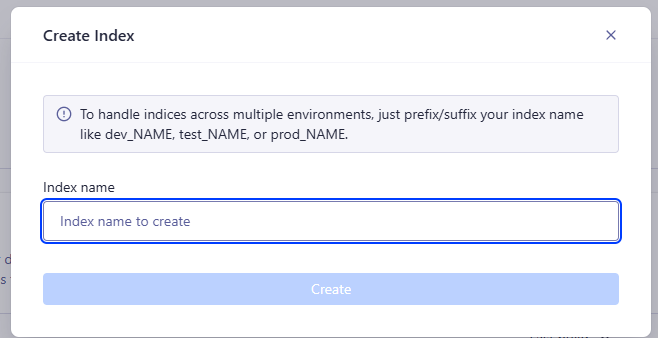
进入页面后,点击 Create Index 创建 Index
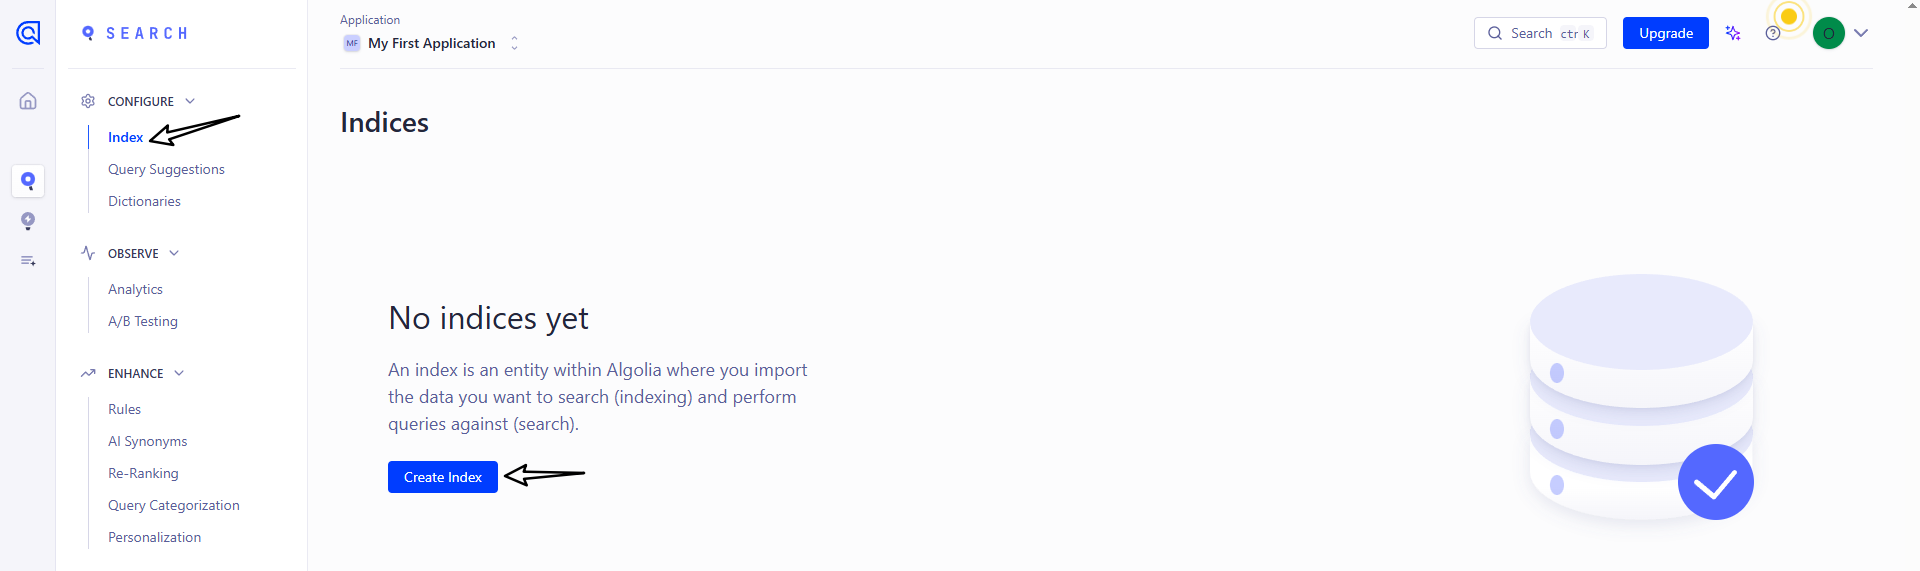
接下来填写 Index 的名称即可
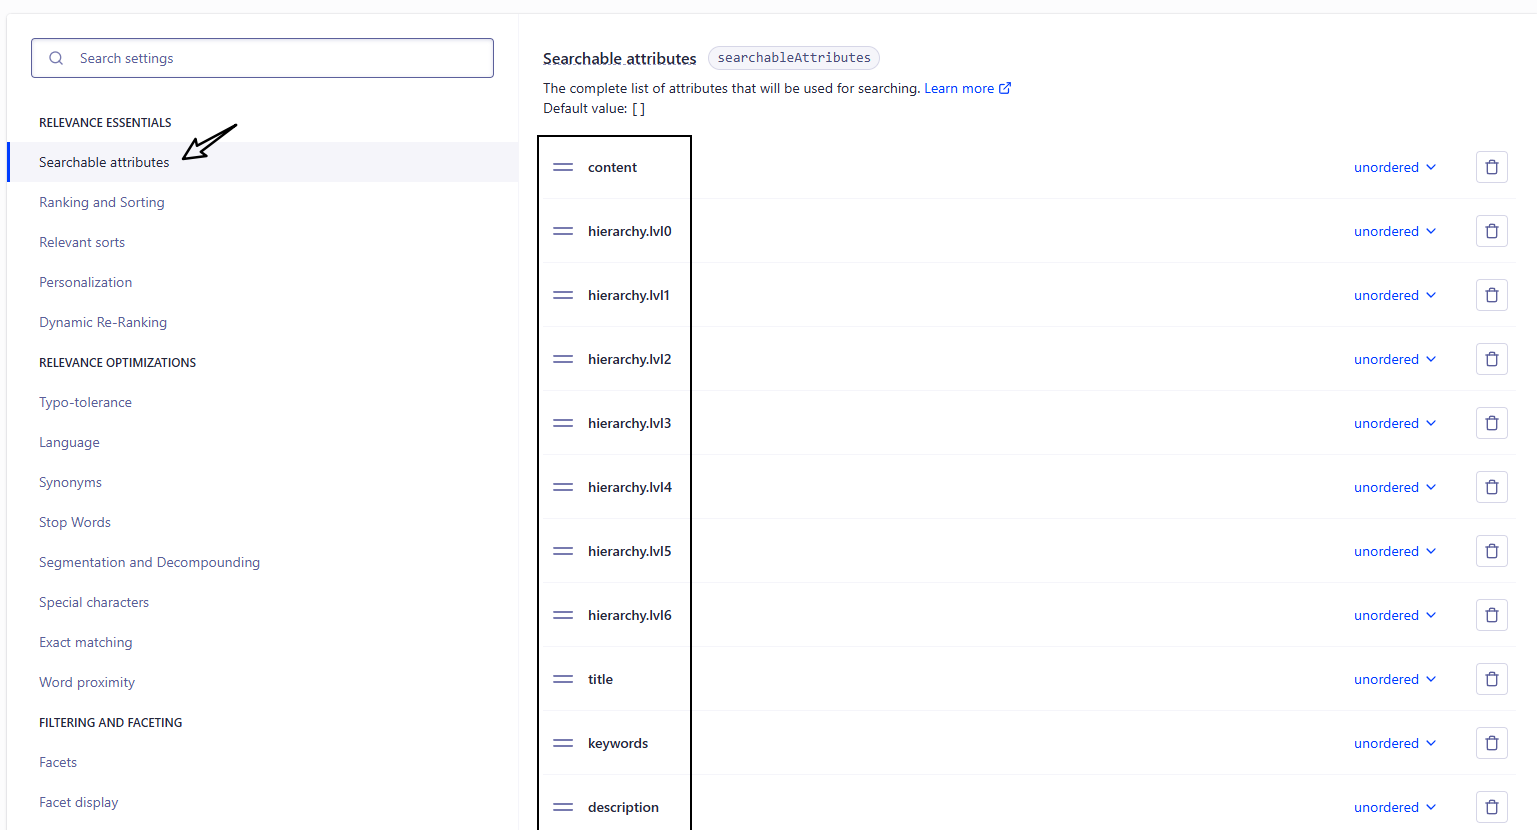
配置 Index(重要)
不要忽略这一步,不然会导致搜索不到内容
找到 Index 页面中的 Configuration 选项

下面需要修改3处地方
Searchable attributes 的值新增:
title
content
keywords
description
lang
language
hierarchy.lvl0
hierarchy.lvl1
hierarchy.lvl2
hierarchy.lvl3
hierarchy.lvl4
hierarchy.lvl5
hierarchy.lvl6
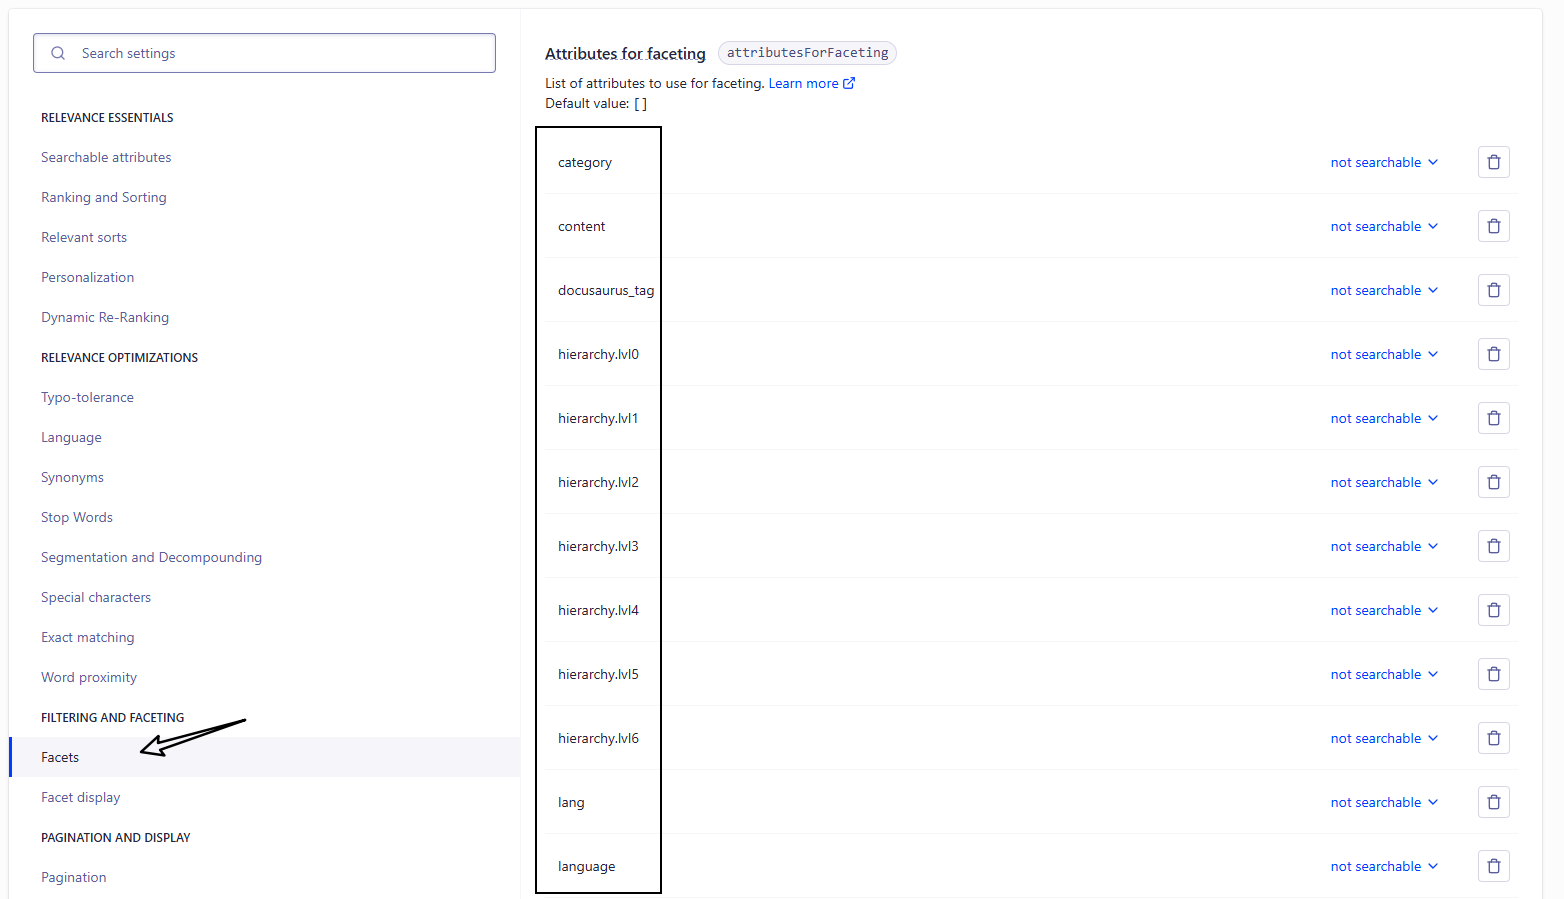
Facts 的值新增:
category
content
docusaurus_tag
lang
language
hierarchy.lvl0
hierarchy.lvl1
hierarchy.lvl2
hierarchy.lvl3
hierarchy.lvl4
hierarchy.lvl5
hierarchy.lvl6
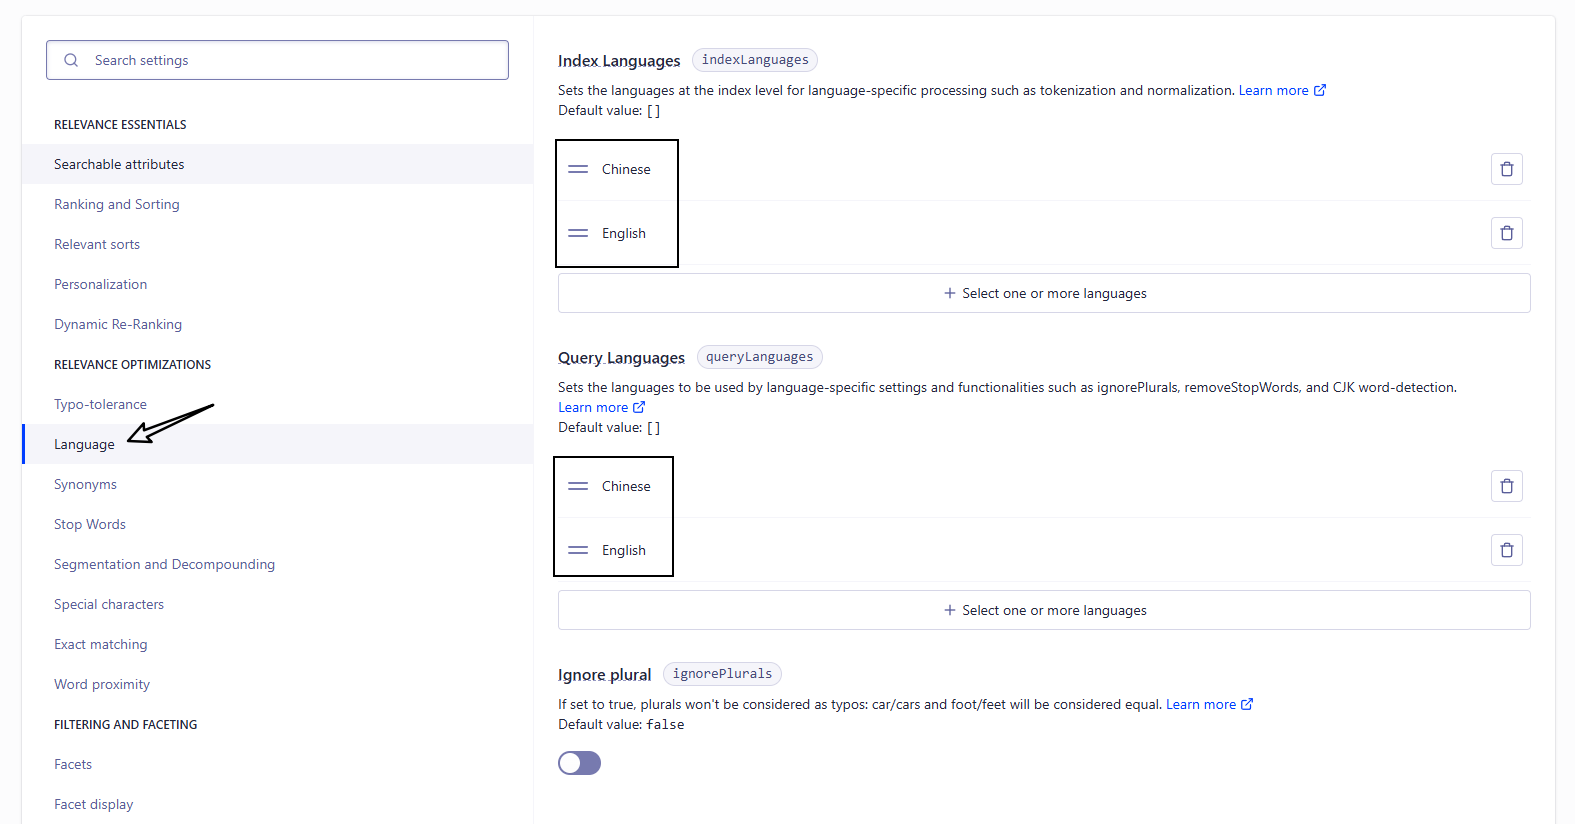
Languages 的值新增:
Index Languages 和 Query Languages 都需要添加
Chinese
English
2. 修改 docusaurus.config.js
{
  "config": {
    "themeConfig": {
      "algolia": {
        "appId": "填写申请的appId",
        "apiKey": "填写申请的apiKey",
        "indexName": "填写申请的indexName"
      }
    }
  }
}
需要填写的信息可以在该页面中进行查找
进入该页面后即可查询到 appId 和 apiKey
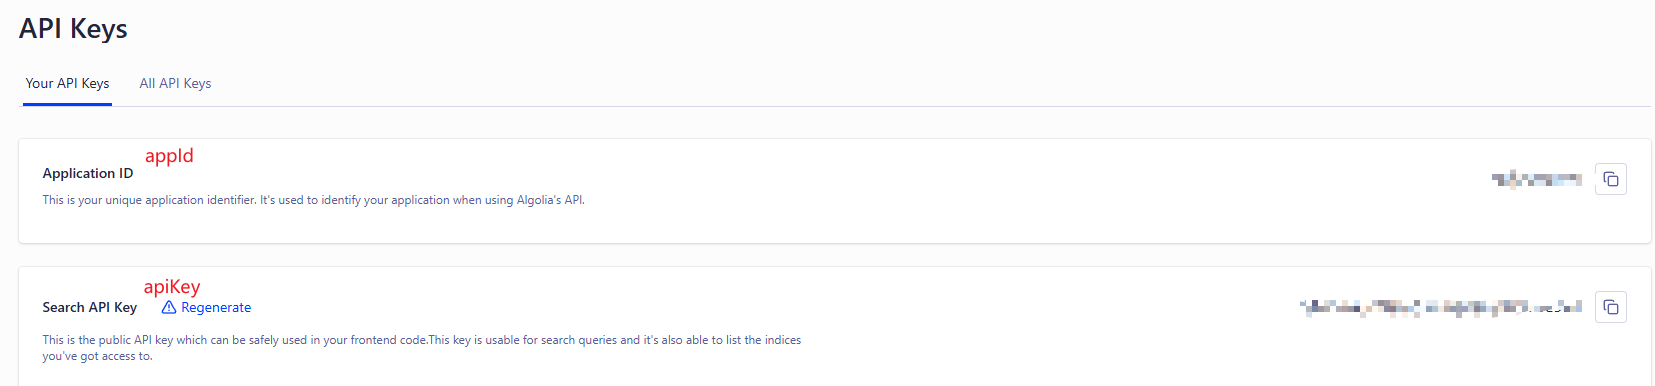
appId:就是申请的 Application IDapiKey:就是 Search API KeyIndexName:就是申请的 Index 的名称
这样就会自动在 navbar 添加个搜索框
3. 爬虫
爬虫就是将自己网站的信息爬到 algolia 网站上,在这分为两种:
- algolia爬虫:使用 algolia 网站上的爬虫进行爬取(这个好像也需要申请)
- 自定义爬虫:配置一个自定义爬虫,使用 Docker 或 GitHub Actions 来自动化执行爬虫任务
algolia爬虫
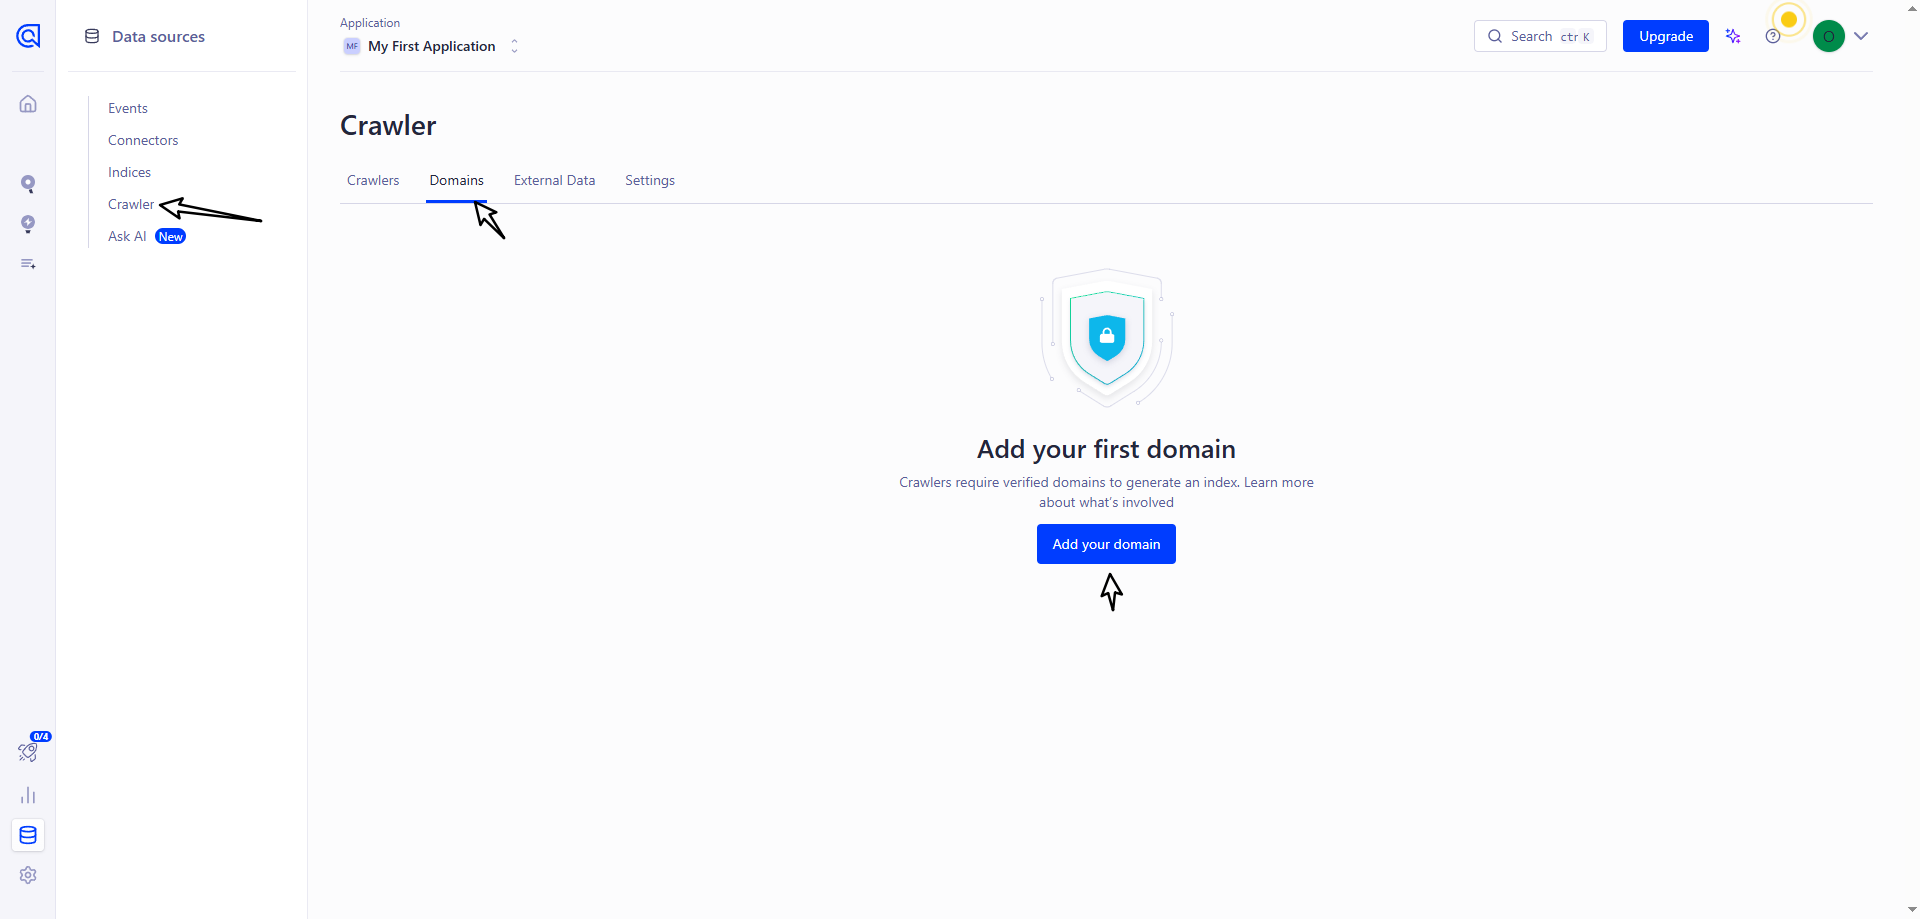
还是进入 Index 页面,点击 event data

点击 Crawler 里面的 Add your domain
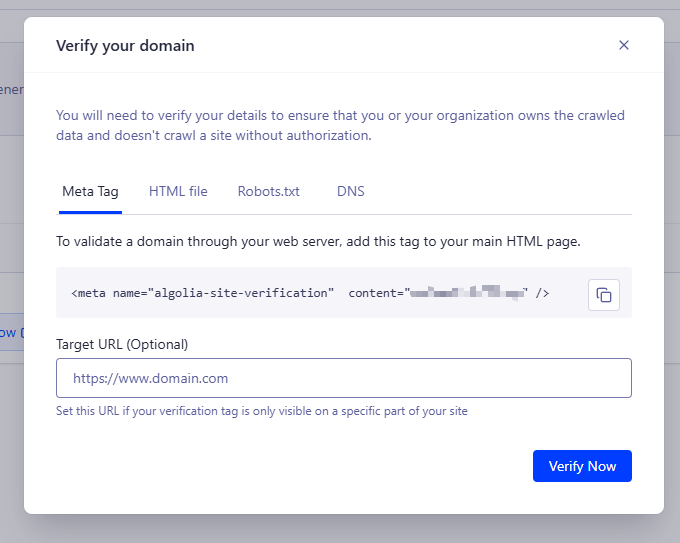
然后输入自己的网址进行验证,可选择多种方式
如果选择 DNS 的话,需要在域名服务商的 DNS 解析处进行配置
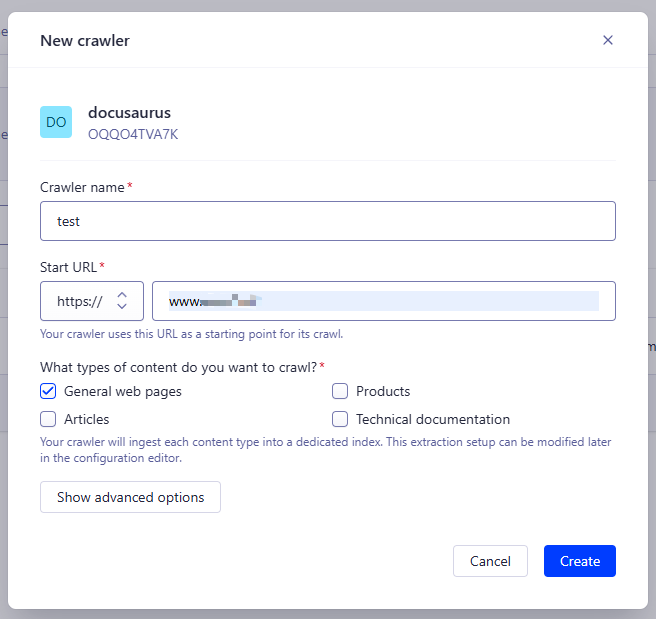
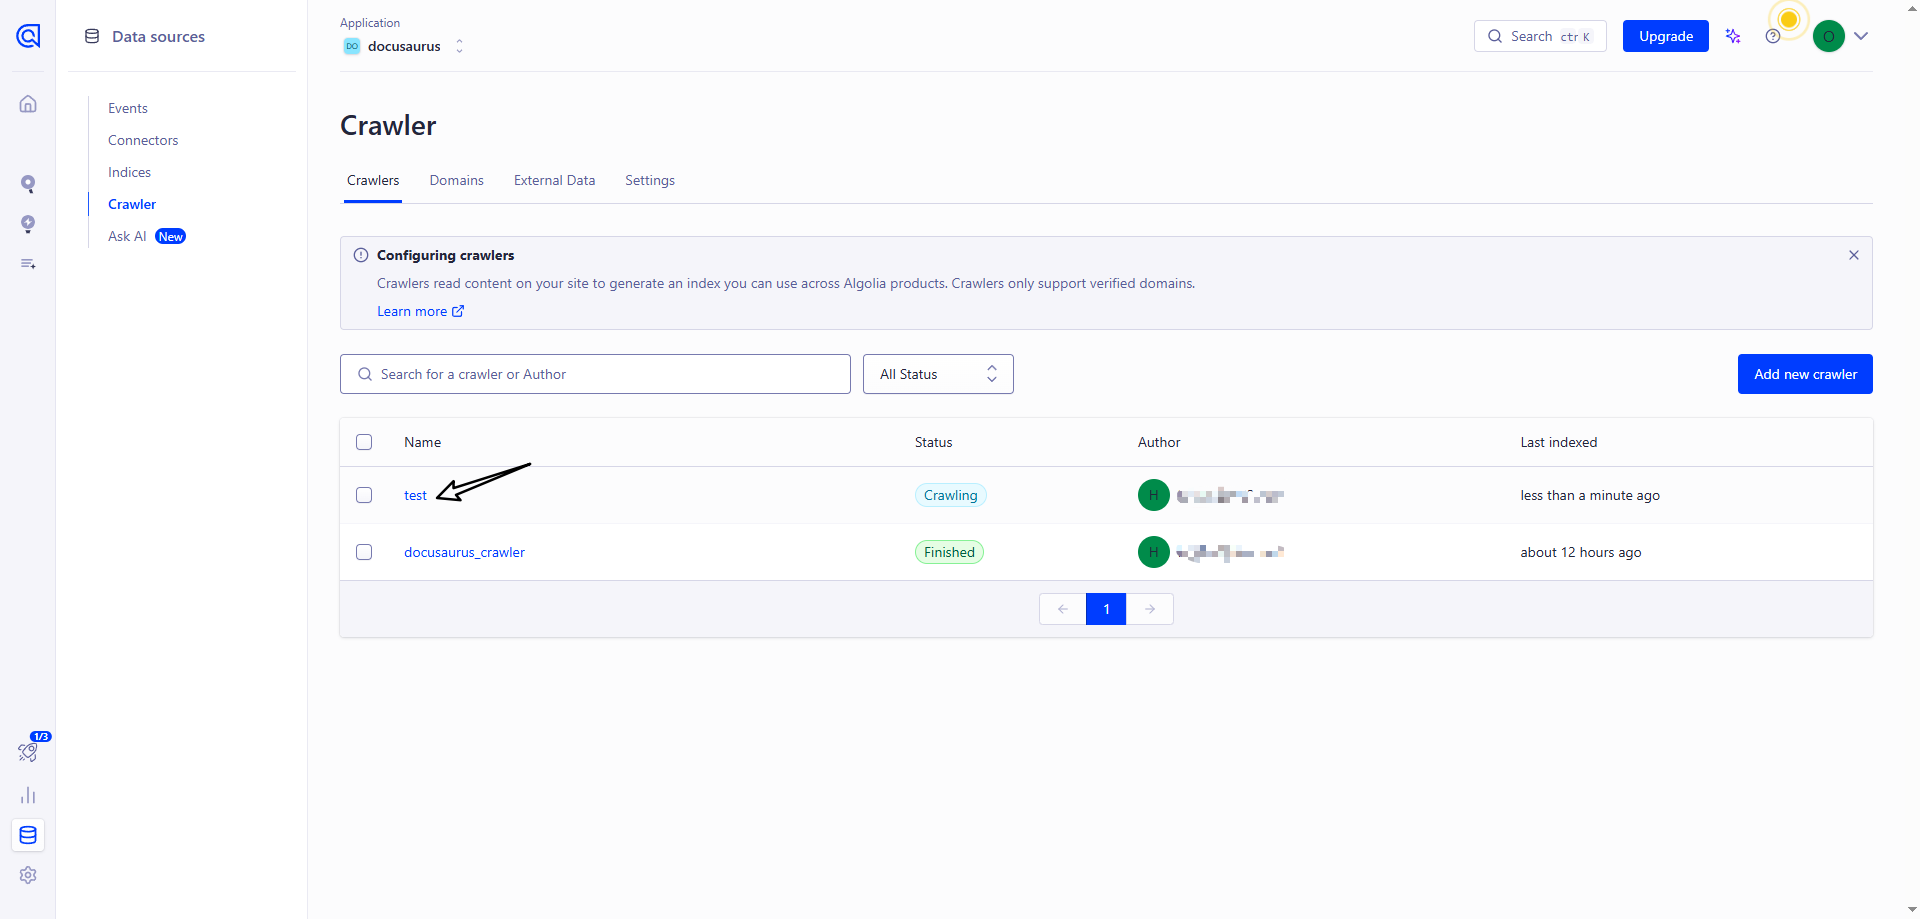
验证成功后,新建爬虫信息
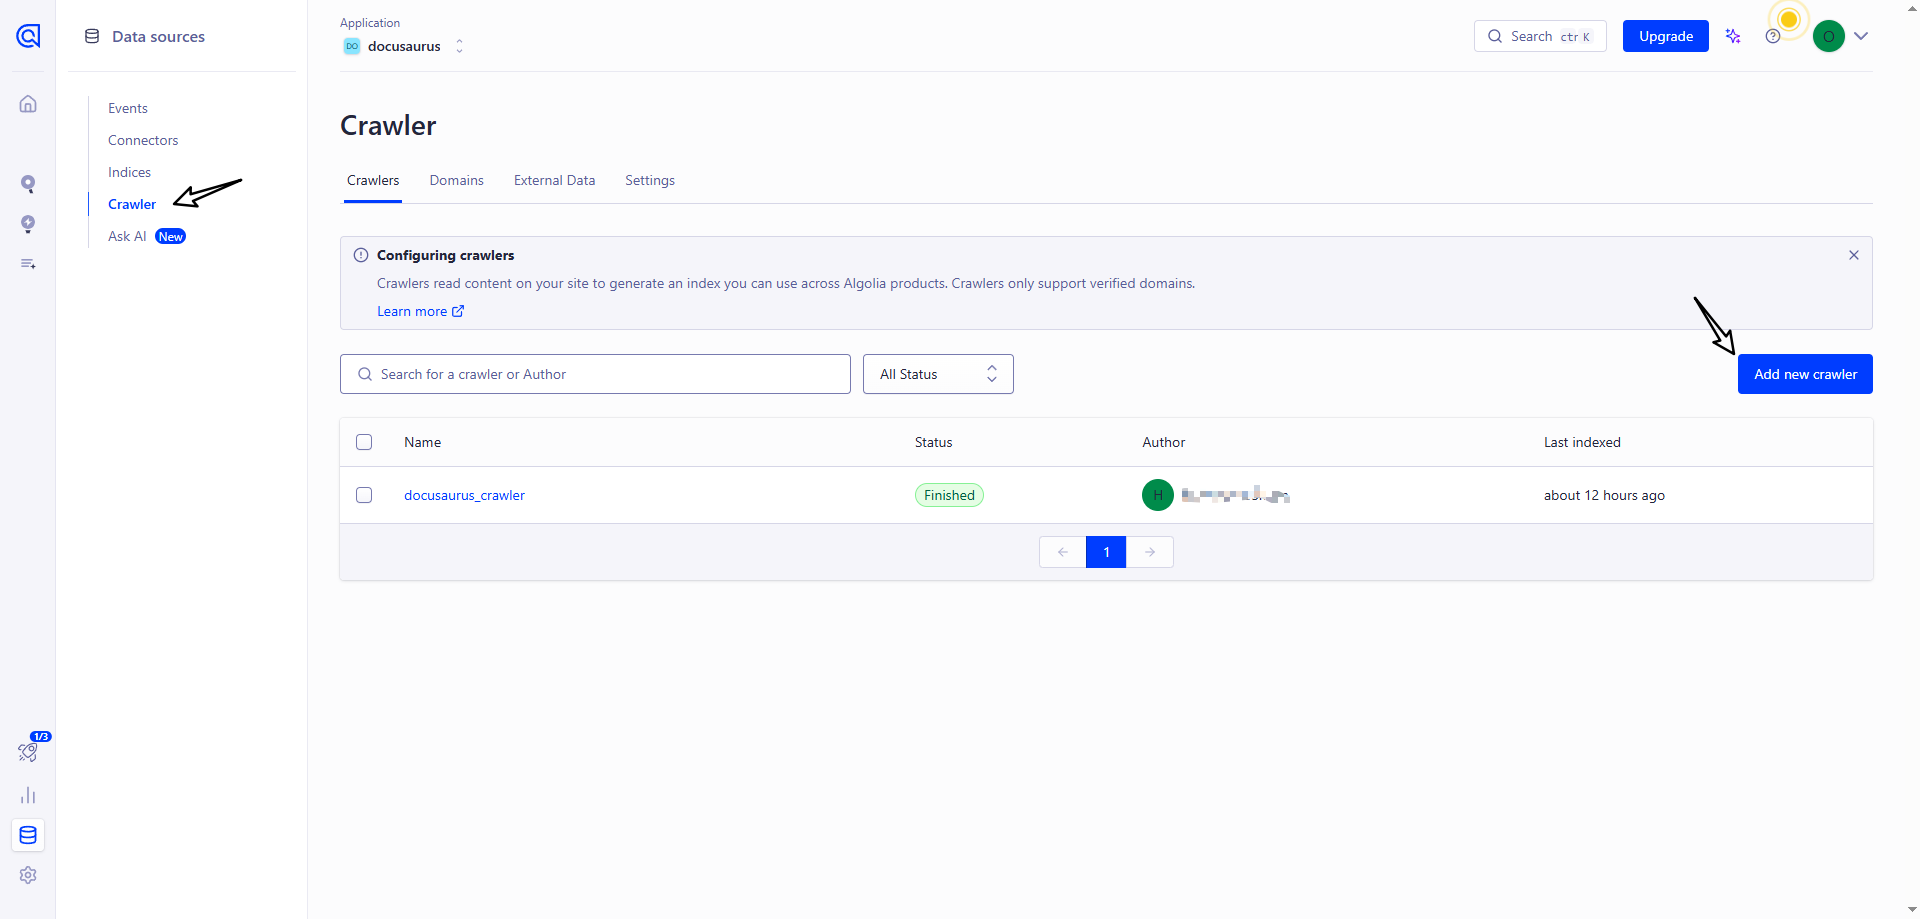
填写相关信息
创建成功后,点击 Index 名称进入爬虫页面
默认创建好就进行爬虫了,但是配置信息需要改下,配置参考 官方推荐
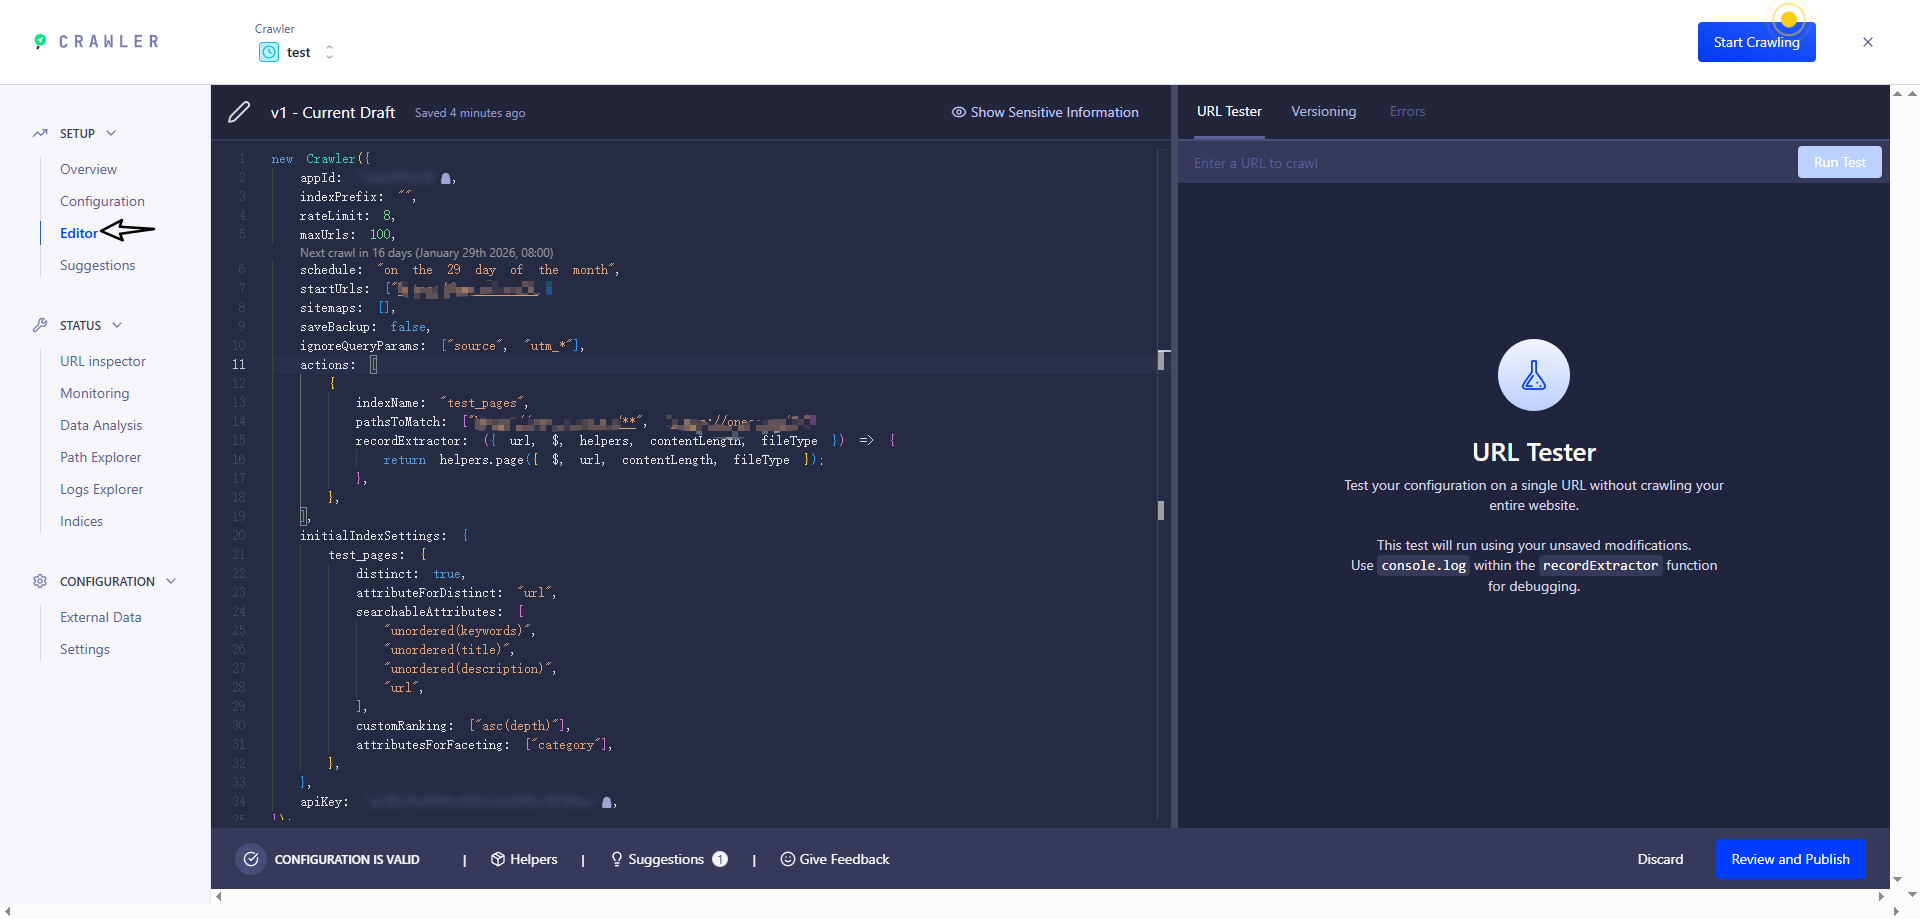
注意:这里用到的key是 Write API Key
new Crawler({
  appId: 'YOUR_APP_ID',
  apiKey: 'YOUR_API_KEY',
  rateLimit: 8,
  maxDepth: 10,
  // 每天0点爬取一次
  schedule: 'every 1 day at 12:00 am',
  startUrls: ['https://YOUR_WEBSITE_URL/'],
  sitemaps: ['https://YOUR_WEBSITE_URL/sitemap.xml'],
  ignoreCanonicalTo: true,
  discoveryPatterns: ['https://YOUR_WEBSITE_URL/**'],
  actions: [
    {
      indexName: 'YOUR_INDEX_NAME',
      pathsToMatch: ['https://YOUR_WEBSITE_URL/**'],
      recordExtractor: ({ $, helpers }) => {
        // priority order: deepest active sub list header -> navbar active item -> 'Documentation'
        const lvl0
          = $(
            '.menu__link.menu__link--sublist.menu__link--active, .navbar__item.navbar__link--active'
          )
            .last()
            .text() || 'Documentation'

        return helpers.docsearch({
          recordProps: {
            lvl0: {
              selectors: '',
              defaultValue: lvl0,
            },
            lvl1: ['header h1', 'article h1'],
            lvl2: 'article h2',
            lvl3: 'article h3',
            lvl4: 'article h4',
            lvl5: 'article h5, article td:first-child',
            lvl6: 'article h6',
            content: 'article p, article li, article td:last-child',
          },
          indexHeadings: true,
          aggregateContent: true,
          recordVersion: 'v3',
        })
      },
    },
  ],
  initialIndexSettings: {
    YOUR_INDEX_NAME: {
      attributesForFaceting: [
        'type',
        'lang',
        'language',
        'version',
        'docusaurus_tag',
      ],
      attributesToRetrieve: [
        'hierarchy',
        'content',
        'anchor',
        'url',
        'url_without_anchor',
        'type',
      ],
      attributesToHighlight: ['hierarchy', 'content'],
      attributesToSnippet: ['content:10'],
      camelCaseAttributes: ['hierarchy', 'content'],
      searchableAttributes: [
        'unordered(hierarchy.lvl0)',
        'unordered(hierarchy.lvl1)',
        'unordered(hierarchy.lvl2)',
        'unordered(hierarchy.lvl3)',
        'unordered(hierarchy.lvl4)',
        'unordered(hierarchy.lvl5)',
        'unordered(hierarchy.lvl6)',
        'content',
      ],
      distinct: true,
      attributeForDistinct: 'url',
      customRanking: [
        'desc(weight.pageRank)',
        'desc(weight.level)',
        'asc(weight.position)',
      ],
      ranking: [
        'words',
        'filters',
        'typo',
        'attribute',
        'proximity',
        'exact',
        'custom',
      ],
      highlightPreTag: '<span class="algolia-docsearch-suggestion--highlight">',
      highlightPostTag: '</span>',
      minWordSizefor1Typo: 3,
      minWordSizefor2Typos: 7,
      allowTyposOnNumericTokens: false,
      minProximity: 1,
      ignorePlurals: true,
      advancedSyntax: true,
      attributeCriteriaComputedByMinProximity: true,
      removeWordsIfNoResults: 'allOptional',
      separatorsToIndex: '_',
    },
  },
})
注意:
schedule现在是每天0点自动爬取,表达式参考 https://www.algolia.com/doc/tools/crawler/apis/configuration/schedule?utm_medium=page_link&utm_source=dashboard
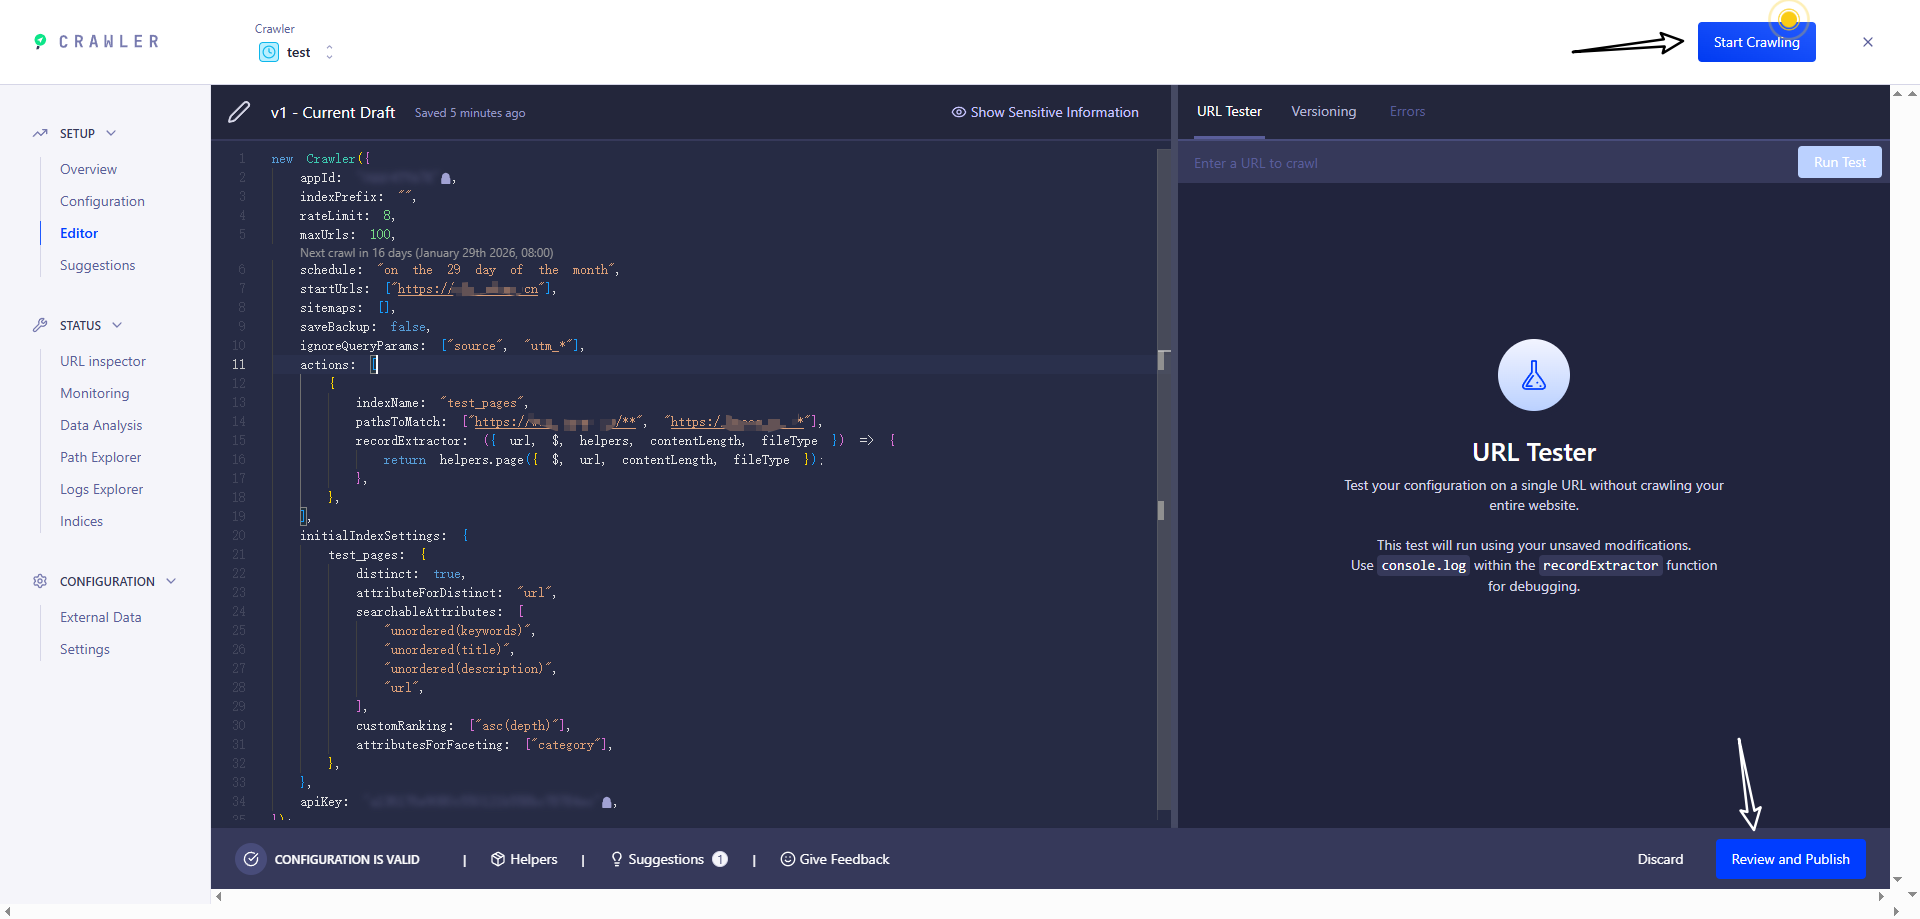
修改成功后重新爬虫
进入该页面即可查看爬虫后的全部信息
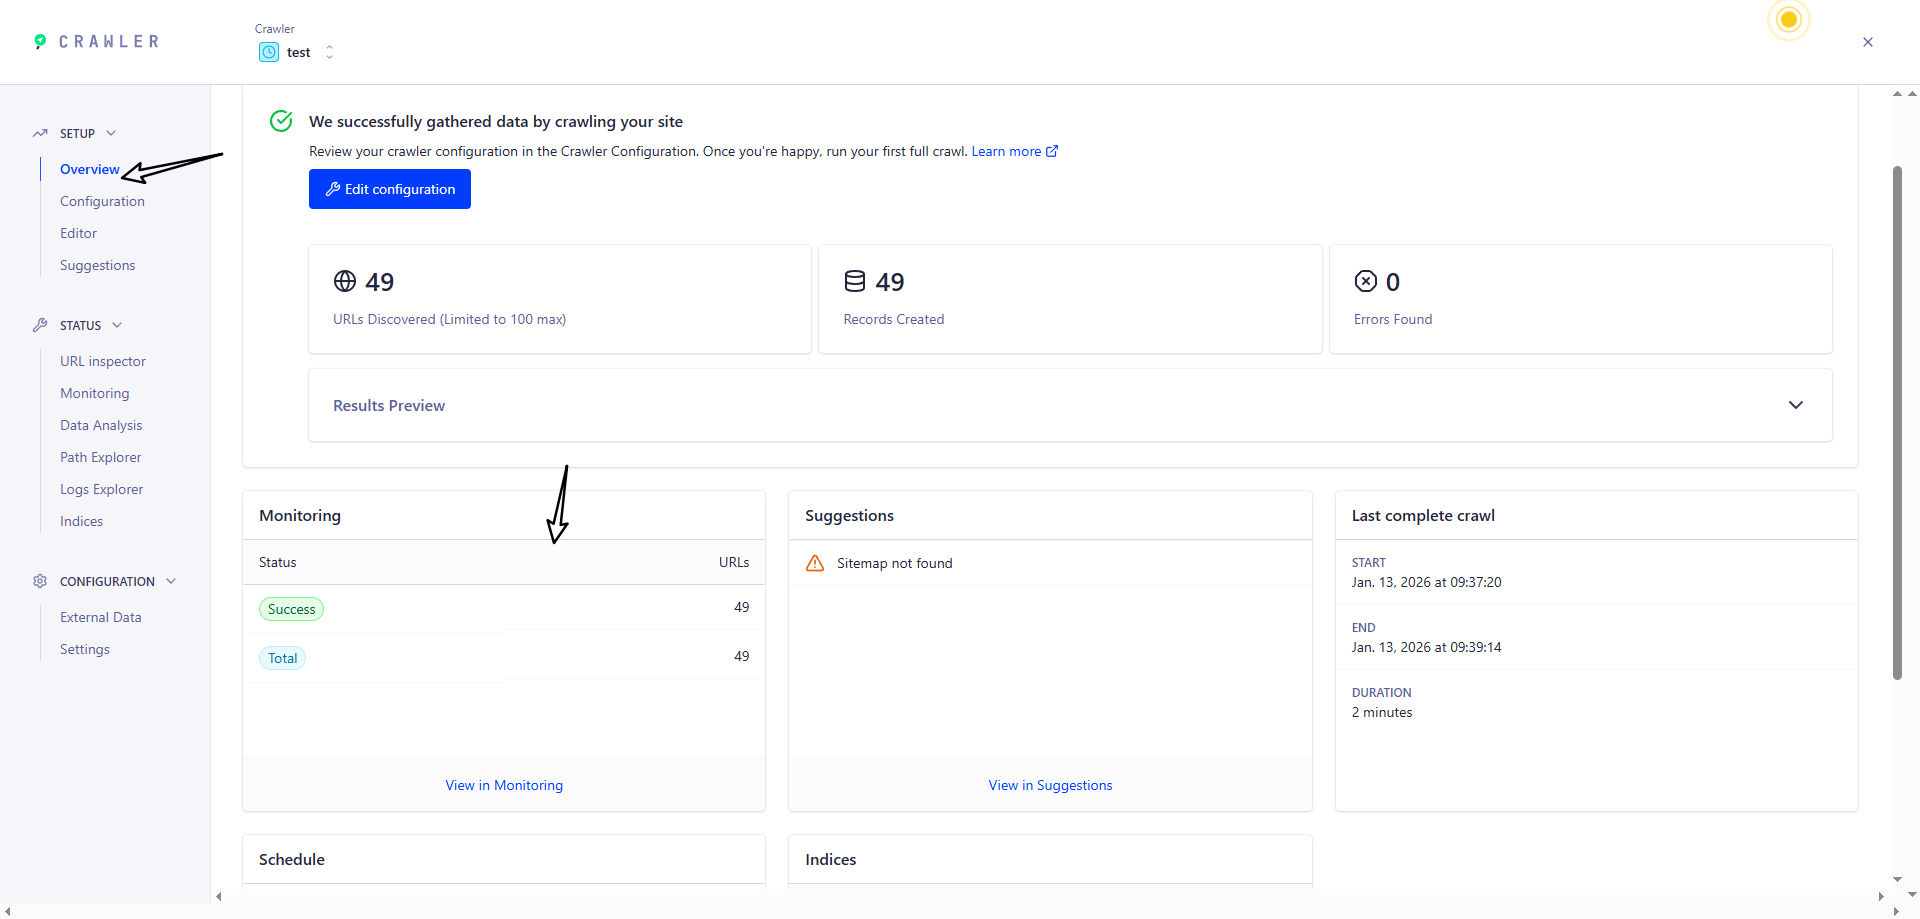
当爬虫结束并成功后,返回 Index 页面,如果出现下面页面的内容即 代表成功

成功后,进入网站进行搜索即可
自定义爬虫(Docker)
服务器上安装 jq 解析 json 文件
sudo apt update && sudo apt install -y jq
在项目根目录下新增 .env 和 .docsearch.json 文件
ALGOLIA_APP_ID=xxx
ALGOLIA_API_KEY=xxx
{
  // 需要替换
  "index_name": "xxx",
  // 需要替换。网站网址
  "start_urls": ["xxx"],
  // 需要替换。sitemap的网址,docusaurus 默认在根目录下生成 sitemap.xml
  "sitemap_urls": ["xxx"],
  "selectors": {
    "lvl0": {
      "selector": "(//ul[contains(@class,'menu__list')]//a[contains(@class, 'menu__link menu__link--sublist menu__link--active')]/text() | //nav[contains(@class, 'navbar')]//a[contains(@class, 'navbar__link--active')]/text())[last()]",
      "type": "xpath",
      "global": true,
      "default_value": "Documentation"
    },
    "lvl1": "header h1, article h1",
    "lvl2": "article h2",
    "lvl3": "article h3",
    "lvl4": "article h4",
    "lvl5": "article h5, article td:first-child",
    "lvl6": "article h6",
    "text": "article p, article li, article td:last-child"
  },
  "custom_settings": {
    "attributesForFaceting": [
      "type",
      "lang",
      "language",
      "version",
      "docusaurus_tag"
    ],
    "attributesToRetrieve": [
      "hierarchy",
      "content",
      "anchor",
      "url",
      "url_without_anchor",
      "type"
    ],
    "attributesToHighlight": ["hierarchy", "content"],
    "attributesToSnippet": ["content:10"],
    "camelCaseAttributes": ["hierarchy", "content"],
    "searchableAttributes": [
      "unordered(hierarchy.lvl0)",
      "unordered(hierarchy.lvl1)",
      "unordered(hierarchy.lvl2)",
      "unordered(hierarchy.lvl3)",
      "unordered(hierarchy.lvl4)",
      "unordered(hierarchy.lvl5)",
      "unordered(hierarchy.lvl6)",
      "content"
    ],
    "distinct": true,
    "attributeForDistinct": "url",
    "customRanking": [
      "desc(weight.pageRank)",
      "desc(weight.level)",
      "asc(weight.position)"
    ],
    "ranking": [
      "words",
      "filters",
      "typo",
      "attribute",
      "proximity",
      "exact",
      "custom"
    ],
    "highlightPreTag": "<span class='algolia-docsearch-suggestion--highlight'>",
    "highlightPostTag": "</span>",
    "minWordSizefor1Typo": 3,
    "minWordSizefor2Typos": 7,
    "allowTyposOnNumericTokens": false,
    "minProximity": 1,
    "ignorePlurals": true,
    "advancedSyntax": true,
    "attributeCriteriaComputedByMinProximity": true,
    "removeWordsIfNoResults": "allOptional",
    "separatorsToIndex": "_",
    "synonyms": [
      ["js", "javascript"],
      ["ts", "typescript"]
    ]
  }
}
然后运行命令
docker run -it --env-file=.env -e "CONFIG=$(cat docsearch.json | jq -r tostring)" algolia/docsearch-scraper
报错:algoliasearch.exceptions.RequestException: Method not allowed with this API key 这个问题就是权限不够,需要使用
Admin API Key
如果出现下面页面的内容即 代表成功

Giscus(评论)
1. 准备一个 github 仓库
新建 或 已存在 的库都可以
修改配置:/Settings/General
保证仓库的 Danger Zone - visibility 是 public的

开启 Features - Discussions 功能

2. 配置 giscus
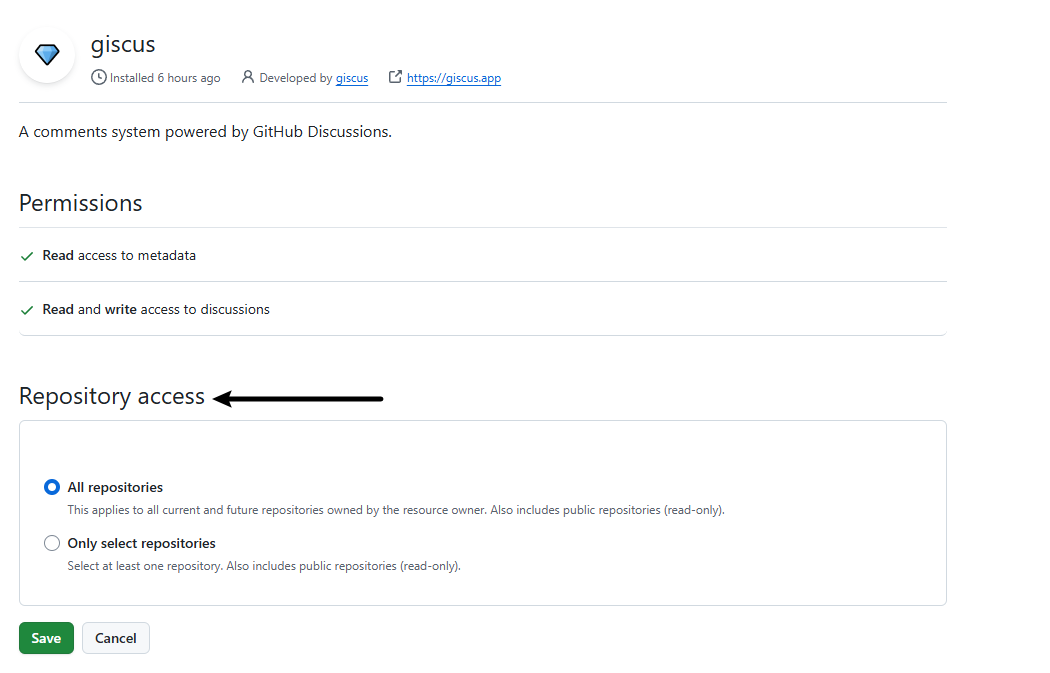
在 github 中开启 giscus 功能,可根据需求选择指定的仓库或公共仓库
开启完毕后进入 giscus 的官网,然后按照顺序配置:
- 选择语言
- 仓库:输入刚刚准备好的 github 仓库地址
- 页面 ↔️ discussion 映射关系 选择 Discussion 的标题包含页面的 pathname
- Discussion 分类 选择第一个 Announcements
- 其他保持默认即可
然后下滑找到 启用 giscus 模块,里面的 <script> 信息需要用到,类似:
<script src="https://giscus.app/client.js"
        data-repo="xxxxx"
        data-repo-id="xxxx"
        data-category="xxxx"
        data-category-id="xxxxx"
        data-mapping="pathname"
        data-reactions-enabled="1"
        data-emit-metadata="0"
        data-input-position="bottom"
        data-theme="light"
        data-lang="zh-CN"
        crossorigin="anonymous"
        async>
3. 在项目中启用
3.1 开启博客评论
pnpm swizzle @docusaurus/theme-classic BlogPostPage
- 选择 Eject (Unsafe) 回车
- 选择 YES: I know what I am doing! 回车
- 这时你的项目目录下src/theme/BlogPostPage生成了自定义主题的文件
添加依赖
pnpm add @docusaurus/theme-common @docusaurus/plugin-content-blog
下一步修改文件代码
下面三处标注是我们要修改添加代码的地方。 注意版本不同配置可能存在差异 根据标注自己找放评论的位置。
import { HtmlClassNameProvider, ThemeClassNames } from '@docusaurus/theme-common'

import { BlogPostProvider, useBlogPost } from '@docusaurus/theme-common/internal'
import BlogLayout from '@theme/BlogLayout'
import BlogPostItem from '@theme/BlogPostItem'
import BlogPostPageMetadata from '@theme/BlogPostPage/Metadata'
import BlogPostPaginator from '@theme/BlogPostPaginator'
import TOC from '@theme/TOC'
import clsx from 'clsx'
import React, { useEffect, useRef } from 'react'

function BlogPostPageContent({ sidebar, children }) {
  const { metadata, toc } = useBlogPost()
  const { nextItem, prevItem, frontMatter } = metadata
  const {
    hide_table_of_contents: hideTableOfContents,
    toc_min_heading_level: tocMinHeadingLevel,
    toc_max_heading_level: tocMaxHeadingLevel,
  } = frontMatter

  const commentElement = useRef(null)

  useEffect(() => {
    // Update the document title using the browser API
    let s = document.createElement('script')
    s.src = 'https://giscus.app/client.js'
    s.setAttribute('data-repo', '[你的仓库]')
    s.setAttribute('data-repo-id', '[你的仓库 ID]=')
    s.setAttribute('data-category', '[你的分类名]')
    s.setAttribute('data-category-id', '[你的分类 ID]')
    s.setAttribute('data-mapping', 'pathname')
    s.setAttribute('data-reactions-enabled', '1')
    s.setAttribute('data-emit-metadata', '0')
    s.setAttribute('data-input-position', 'bottom')
    s.setAttribute('data-theme', document.documentElement.getAttribute('data-theme'))
    s.setAttribute('data-lang', 'zh-CN')
    s.setAttribute('crossorigin', 'anonymous')
    s.async = true
    commentElement.current.appendChild(s)
  }, [])

  return (
    <BlogLayout
      sidebar={sidebar}
      toc={
        !hideTableOfContents && toc.length > 0
          ? (
              <TOC
                toc={toc}
                minHeadingLevel={tocMinHeadingLevel}
                maxHeadingLevel={tocMaxHeadingLevel}
              />
            )
          : undefined
      }
    >
      <BlogPostItem>{children}</BlogPostItem>

      {(nextItem || prevItem) && (
        <BlogPostPaginator nextItem={nextItem} prevItem={prevItem} />
      )}

      <div style={{ marginTop: '20px' }} ref={commentElement}></div>

    </BlogLayout>
  )
}

export default function BlogPostPage(props) {
  const BlogPostContent = props.content
  return (
    <BlogPostProvider content={props.content} isBlogPostPage>
      <HtmlClassNameProvider
        className={clsx(
          ThemeClassNames.wrapper.blogPages,
          ThemeClassNames.page.blogPostPage,
        )}
      >
        <BlogPostPageMetadata />
        <BlogPostPageContent sidebar={props.sidebar}>
          <BlogPostContent />
        </BlogPostPageContent>
      </HtmlClassNameProvider>
    </BlogPostProvider>
  )
}
3.2 开启文档评论
pnpm swizzle @docusaurus/theme-classic DocItem/Layout
- 选择 Eject (Unsafe) 回车
- 选择 YES: I know what I am doing! 回车
- 这时你的项目目录下src/theme/BlogPostPage生成了自定义主题的文件
添加依赖
pnpm add @docusaurus/plugin-content-docs
下一步修改文件代码
下面三处标注是我们要修改添加代码的地方。 注意版本不同配置可能存在差异 根据标注自己找放评论的位置。
import { useDoc } from '@docusaurus/plugin-content-docs/client'
import { useWindowSize } from '@docusaurus/theme-common'
import ContentVisibility from '@theme/ContentVisibility'
import DocBreadcrumbs from '@theme/DocBreadcrumbs'
import DocItemContent from '@theme/DocItem/Content'
import DocItemFooter from '@theme/DocItem/Footer'
import DocItemPaginator from '@theme/DocItem/Paginator'
import DocItemTOCDesktop from '@theme/DocItem/TOC/Desktop'
import DocItemTOCMobile from '@theme/DocItem/TOC/Mobile'
import DocVersionBadge from '@theme/DocVersionBadge'
import DocVersionBanner from '@theme/DocVersionBanner'
import clsx from 'clsx'
import React, { useEffect, useRef } from 'react'
import styles from './styles.module.css'
/**
 * Decide if the toc should be rendered, on mobile or desktop viewports
 */
function useDocTOC() {
  const { frontMatter, toc } = useDoc()
  const windowSize = useWindowSize()
  const hidden = frontMatter.hide_table_of_contents
  const canRender = !hidden && toc.length > 0
  const mobile = canRender ? <DocItemTOCMobile /> : undefined
  const desktop
    = canRender && (windowSize === 'desktop' || windowSize === 'ssr')
      ? (
          <DocItemTOCDesktop />
        )
      : undefined
  return {
    hidden,
    mobile,
    desktop,
  }
}
export default function DocItemLayout({ children }) {
  const docTOC = useDocTOC()
  const { metadata } = useDoc()

  const commentElement = useRef(null)

  useEffect(() => {
    // Update the document title using the browser API
    let s = document.createElement('script')
    s.src = 'https://giscus.app/client.js'
    s.setAttribute('data-repo', '[你的仓库]')
    s.setAttribute('data-repo-id', '[你的仓库 ID]=')
    s.setAttribute('data-category', '[你的分类名]')
    s.setAttribute('data-category-id', '[你的分类 ID]')
    s.setAttribute('data-mapping', 'pathname')
    s.setAttribute('data-reactions-enabled', '1')
    s.setAttribute('data-emit-metadata', '0')
    s.setAttribute('data-input-position', 'bottom')
    s.setAttribute('data-theme', document.documentElement.getAttribute('data-theme'))
    s.setAttribute('data-lang', 'zh-CN')
    s.setAttribute('crossorigin', 'anonymous')
    s.async = true
    commentElement.current.appendChild(s)
  }, [])

  return (
    <div className="row">
      <div className={clsx('col', !docTOC.hidden && styles.docItemCol)}>
        <ContentVisibility metadata={metadata} />
        <DocVersionBanner />
        <div className={styles.docItemContainer}>
          <article>
            <DocBreadcrumbs />
            <DocVersionBadge />
            {docTOC.mobile}
            <DocItemContent>{children}</DocItemContent>

            <div style={{ marginTop: '20px' }} ref={commentElement}></div>

            <DocItemFooter />
          </article>
          <DocItemPaginator />
        </div>
      </div>
      {docTOC.desktop && <div className="col col--3">{docTOC.desktop}</div>}
    </div>
  )
}